

Coffee Brewing Tips for Beginners: A 2026 Guide
Table of Contents
- Coffee Brewing Tips for Beginners: Start With the Right Beans
- Coffee Brewing Ratios for Beginners: The Golden Ratio Explained
- Coffee Grind Size Guide: Match Your Grind to Your Brewer
- Water Temperature and Quality: The Invisible Ingredient
- Essential Equipment for Beginners: Budget vs. Prosumer
- Troubleshooting Bitter or Sour Coffee: Fix Your Cup Fast
- Flavor Profile Mapping: Train Your Palate
- Frequently Asked Questions
Last Updated: September 17, 2026
Coffee Brewing Tips for Beginners: Start With the Right Beans
Great coffee brewing tips for beginners start with one truth: the bean matters more than the machine. At Regnal Roasts, we've watched home brewers chase gear upgrades for months while ignoring stale beans sitting in their pantry. That's backwards.
Freshly roasted whole bean coffee is the foundation. Once beans are ground, they shed aroma fast. Whole bean holds flavor for weeks; pre-ground fades in days. According to the Specialty Coffee Association's brewing guidance, freshness and proper extraction drive nearly every quality difference a beginner can taste.
So before you touch a single setting, ask three questions:
- When was this coffee roasted?
- Is it whole bean or pre-ground?
- How is it stored?
Most beginners skip these. Then they blame their brewer.
Here's the good news: fixing the bean fixes most of the cup.
Coffee Brewing Ratios for Beginners: The Golden Ratio Explained
A coffee-to-water ratio is the weight of coffee grounds compared to the weight of water. The standard starting point is 1:15 to 1:18, meaning one part coffee to fifteen or eighteen parts water.
For a single 10-ounce cup, that's roughly 18-20 grams of coffee. Too little coffee tastes weak and sour. Too much tastes heavy and bitter.
| Ratio | Coffee (per 10 oz water) | Taste Result | Best For |
|---|---|---|---|
| 1:15 | 20 g | Bold, strong | Dark roasts |
| 1:16 | 18 g | Balanced | Most beginners |
| 1:17 | 17 g | Mild | Light roasts |
| 1:18 | 16 g | Delicate | Single origins |
A coffee scale removes the guesswork. Scoops vary wildly, so weighing your grounds is the single easiest upgrade. If you're still dialing in your setup, the National Coffee Association's brewing basics cover why consistency beats precision tricks.
Start at 1:16. Adjust from there.
Coffee Grind Size Guide: Match Your Grind to Your Brewer
Grind size is the single biggest lever a beginner can pull, because it controls how fast water pulls flavor out of the coffee. Think of each ground particle as a tiny cell holding acids, sugars, and bitter compounds. Water dissolves the bright, fruity acids first, then the sweet sugars, then the harsh, drying bitter compounds last. The smaller the particle, the more surface area the water touches, and the faster all three stages happen.
That's why grind size and brew time are a matched pair:
- Coarse grind + long contact time (French press, cold brew) extracts evenly because water has to work to reach the center of each big particle.
- Fine grind + short contact time (espresso, moka pot) extracts quickly because water hits almost every surface at once.
- Mismatch either way and you get sour, thin coffee (under-extracted) or bitter, drying coffee (over-extracted).
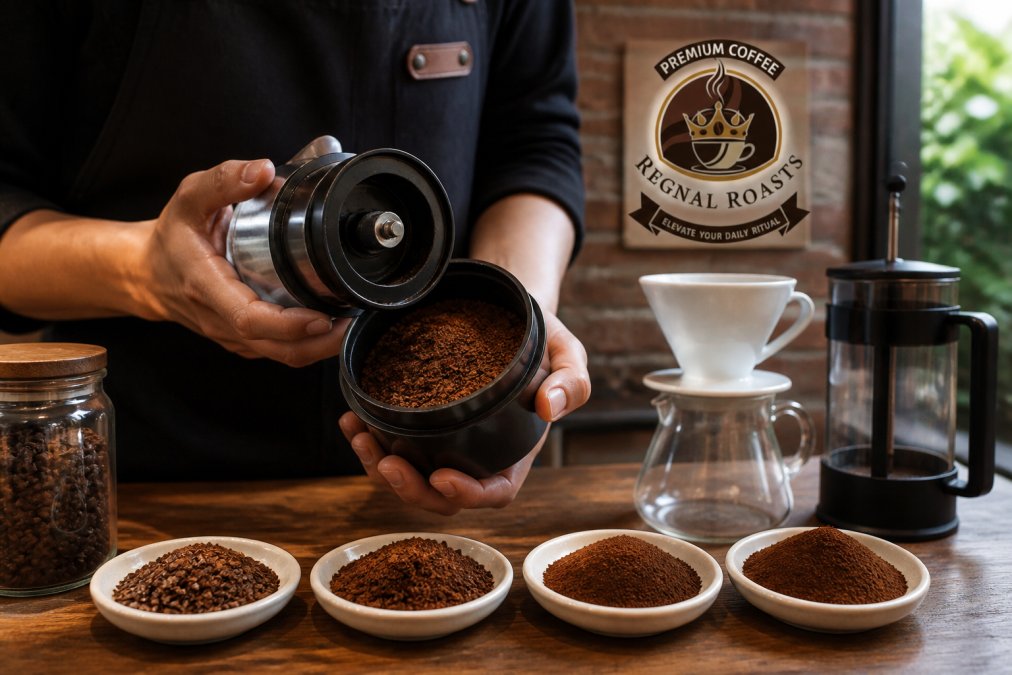
Here's how the common methods line up. Particle sizes are approximate, use them as a starting point, not a rule:
| Method | Grind | Texture Reference | Typical Particle Size | Brew Time |
|---|---|---|---|---|
| French press | Coarse | Sea salt | ~800-1000 microns | 4 min steep |
| Drip machine | Medium | Table salt | ~600-800 microns | 5-8 min cycle |
| Pour-over (V60, Chemex) | Medium-fine | Fine sand | ~400-600 microns | 2.5-4 min |
| AeroPress | Fine-medium | Fine sand to table salt | ~300-600 microns | 1-2 min |
| Moka pot | Fine | Powdered sugar, slightly coarser | ~200-400 microns | 3-5 min |
| Espresso | Very fine | Powdered sugar | ~200-300 microns | 25-30 sec |
A burr grinder crushes beans between two rotating burrs set a fixed distance apart, so every particle comes out roughly the same size. A blade grinder spins a metal blade and chops beans randomly, you get powder, chunks, and everything between in the same batch.
If you use a single-serve brewer, grind size is handled for you. Regnal Roasts K-Cup compatible pods arrive nitrogen-sealed with a precision filter built to extract evenly, so you skip the grinder debate entirely.
Water Temperature and Quality: The Invisible Ingredient
Water makes up about 98% of your cup, so its temperature and quality matter more than most beginners realize. The target brew temperature is 195°F to 205°F, just below boiling.
Essential Equipment for Beginners: Budget vs. Prosumer
You don't need a wall of gear to brew well. A few core tools carry almost all the quality difference, and spending more only helps once you've outgrown the basics.
| Item | Budget Pick | Prosumer Pick | Why It Matters |
|---|---|---|---|
| Grinder | Hand burr grinder | Electric burr grinder | Even particles |
| Scale | Basic kitchen scale | 0.1g precision scale | Repeatable ratios |
| Kettle | Stovetop | Temperature-controlled | Steady heat |
| Brewer | Drip machine | Pour-over setup | Control |
Troubleshooting Bitter or Sour Coffee: Fix Your Cup Fast
Bitter coffee means over-extraction. Sour coffee means under-extraction. Once you know which one you're tasting, the fix is usually one adjustment away.
Work through this list before changing anything else:
- Sour or weak? Grind finer or add more coffee.
- Bitter or harsh? Grind coarser or use less coffee.
- Both sour and bitter? Your grind is uneven. Switch to a burr grinder.
- Flat and dull? Your water is too cool or your beans are stale.
- Thin and watery? Check your ratio; you're likely under-dosing.
Flavor Profile Mapping: Train Your Palate
Most brewing guides stop at the recipe. They tell you the ratio, the temperature, the grind, and then leave you staring at a cup wondering whether it's "good." Flavor profile mapping is the missing step: learning to name what you taste so you can brew toward it on purpose.
- Acidity, the bright, juicy, tongue-tingling sensation. Think lemon, green apple, cranberry. High-acidity coffees taste lively; low-acidity coffees taste smooth and round.
- Body, the weight and texture on your tongue. Think skim milk (light body) versus whole milk or cream (heavy body). Body is about mouthfeel, not strength.
Now place the common brew methods on that map:
| Method | Acidity | Body | Flavor Tendency |
|---|---|---|---|
| Pour-over (V60, Chemex) | High | Light | Clean, tea-like, origin-forward |
| Drip machine | Medium | Medium | Balanced, approachable |
| AeroPress | Medium-high | Medium | Concentrated, flexible |
| French press | Low-medium | Heavy | Rich, oily, chocolatey |
| Moka pot | Medium | Heavy | Intense, syrupy |
| Espresso | Medium | Very heavy | Dense, sweet-bitter |
How to actually taste
Professional cuppers use a technique called slurping. It looks odd, but it works: pull a small amount of coffee from a spoon with a sharp inhale. The spray coats your whole palate and pushes aroma up into your nasal cavity, where most of what you call "flavor" actually lives. You don't have to slurp every cup, but try it once, you'll taste notes you missed on a normal sip.
Then run this simple weekly exercise:
- First impression. Taste your coffee and write down the very first word that comes to mind. Don't overthink it.
- Category check. Sip again and ask: is it fruity, nutty, chocolatey, floral, or spicy? Pick one.
- Acidity check. Does it make your mouth water or pucker? That's acidity. Or does it feel smooth and flat?
- Body check. Swish it. Does it feel like skim milk, whole milk, or cream?
- Finish. Swallow and wait ten seconds. Does the flavor linger or vanish? A long, pleasant finish usually signals a well-extracted cup.
Connecting taste back to brew
Once you can name what you taste, troubleshooting gets easier. A cup that's bright but thin usually needs a finer grind or a longer brew time to build body. A cup that's heavy but dull usually needs a coarser grind or a shorter brew to lift the acidity. You're not guessing anymore, you're steering.
Frequently Asked Questions
What is the best way to brew coffee for a beginner?
Start with freshly roasted whole beans, a burr grinder, and a simple pour-over or French press. Use a 1:15 coffee-to-water ratio, water just off the boil (195-205°F), and a medium grind. This method is forgiving and lets you adjust one variable at a time. Try Regnal Roasts' Best Sellers Sample Pack to explore different roasts without committing to a full bag.
What is the golden ratio for brewing coffee?
The golden ratio is 1 gram of coffee to 15-18 grams of water. For a standard 8-ounce cup, use about 15 grams of coffee and 225 grams of water. Adjust to taste: more coffee for a stronger cup, less for a milder one. A digital scale makes this easy and consistent. This ratio works for drip, pour-over, and French press.
How does grind size affect the taste of my coffee?
Grind size controls extraction speed. Too coarse, and water passes too quickly, leaving sour, weak coffee. Too fine, and water over-extracts, creating bitterness. Match grind to method: coarse for French press, medium for drip, fine for espresso. If your coffee tastes sour, grind finer; if bitter, grind coarser. Adjust in small steps.
Why is water temperature important for coffee extraction?
Water temperature determines how efficiently flavor compounds dissolve. The ideal range is 195-205°F (just off boiling). Too hot, and you scorch the grounds, causing bitterness. Too cool, and you get sour, under-extracted coffee. If you don't have a temperature-controlled kettle, boil water and let it sit for 30 seconds before pouring.